IIT KGP: Bypassing network restrictions without compromising on internet speed
Bypassing Network Restrictions Via A Self Hosted VPN Server

Edit (17th Nov): Added speed test for Central India based servers (at the bottom)
The campus has finally reopened after nearly a year and a half. While most things look the same (apart from the lack of people, obviously), a few things have changed. One of them is internet access. My internet speed is now reaching up to 500 Mbps :-). But it comes at the cost of enhanced “security measures” as if the current restrictions were not annoying enough.
I spent nearly half an hour trying to debug why I can’t ssh into a remote server (spoiler alert: I was on campus wifi). In another incident, I kept scratching my head about why I can’t push commits to a remote repo only to realize that GitHub authentication has shifted to ssh. The hassle involved in using ssh on campus is nothing new. However, with these new measures, WhatsApp has completely stopped working (Yes, even WhatsApp web). This was the final nail on the coffin for reasons obvious to anyone familiar with online classes. While the usual workaround of VPN is working, most of the free, shady ones barely cross 2 Mbps and are a massive pain in the neck. So I decided to use the following workaround to set up my own VPN server using freebies provided by the GitHub student pack.
Lets get started:
Step 1: Getting Freebies
- First of all, you will need a Github Student Pack. In case you haven’t signed up yet, follow this guide to see how. All you need is your institute email and a valid id card or any other proof of enrollment.
- Now head to the benefits page and filter the cloud section. Or follow this link. There are a few options, but I chose to use Azure. Follow the steps to sign up for Azure, and you will receive $100 credits.
Step 2: Creating Virtual Machine
Head over to the Azure portal to create a virtual machine. Follow these steps:
Create a resource -> Compute -> Virtual Machine. Fill in the necessary details. A few things you need to be careful about areregion,size, andimage.A standard B1s size is going to be good enough and last around 11 months using free credits. Now choose the closest region where the said size is available, which in my case was South-East Asia. A bigger (aka more costly) size would probably be available in Indian regions. Also, I choose to go with a Debian 11 image.
Make sure to generate the ssh key pair for authentication and put the details under the
administrator accountsection. You can generate ssh key pair using the following command.$ ssh-keygen -m PEM -t rsa -b 4096This will generate a public-private key pair. Now choose the
use existing public keyoption and fill in the username and contents of the generated public key (.pub file)Keep the defaults in next sections and create the Virtual Machine.
Once the VM is ready, head to its overview and assign it a DNS name (Under essentials section). Also under
settings->networkingadd a new inbound port rule to open either port 80 or 443.Now you can ssh into the vm using
$ ssh -i path/to/privatekey user@host_address. A more convenient way is to add config details to the ssh config file (~/.ssh/config). The config will look something like this:1 2 3 4 5
Host <SomeName> HostName <Host Address> User <Username> IdentityFile /path/to/privatekey IdentitiesOnly yes
Then you can ssh simply by using
$ ssh SomeName.Note: make sure you have set correct permissions on the private key or else you will get an error during ssh. You can fix this by changing the permissions using the following command:
$ chmod 400 /path/to/privatekey
Step 3: Setting Up OpenVPN Access Server:
- Thanks to a few popular installer scripts, installing an OpenVPN server is straightforward once you have ssh’ed into the remote machine. Follow the steps in either of these scripts to install the VPN server on the remote machine.
Run the same script to generate new clients (you will need a unique client for each device that’s going to be connected to the VPN)
Now copy the client ovpn files to your device using scp:
$ scp -i /path/to/privatekey <username>@<host>:/path/to/ovpn_file ~/Documents/ You can skip the -i (identity file) parameter if you have added the ssh config earlier.
To start/stop/check status of open-vpn server use
systemctl:$ sudo systemctl start/stop/status openvpn@server.service
Step 4: Connecting to VPN on client devices:
Android: Copy the ovpn file to the device and download a client. There are two options:
I prefer the open-source client as it allows you to choose which apps use VPN and which don’t selectively. Now run the client, load the ovpn file and connect. And you are done.
Linux: In many distros, you can go to the network manager and import the ovpn file. If not then install OpenVPN (
$ sudo apt-get install openvpn) and run using$ sudo openvpn --config /path/to/config.ovpn.Windows: Download the official client, import the ovpn file and run.
Final Speed Test:
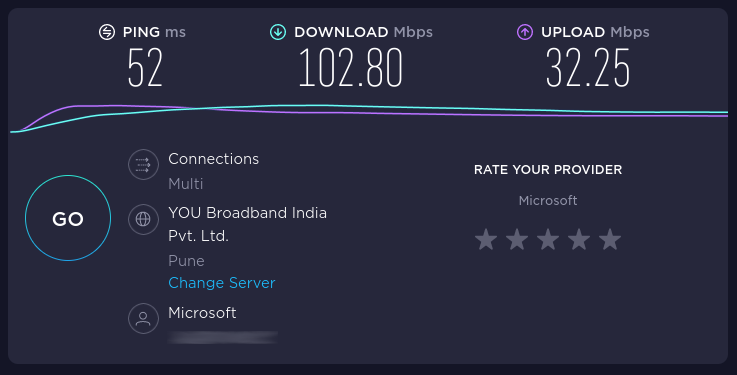
Speed test results for Central India based server:
Speed test results for South-East Asia.
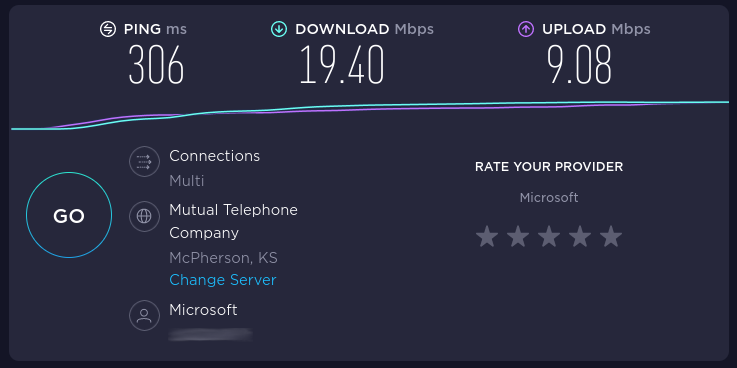
The speed is more than enough for most people. I have used it to browse the web, stream content in full HD, and download torrents without any issues so far. And remember, you can choose to only use VPN on selected apps such as messaging apps, browsers, etc., and still enjoy full speeds on other apps.
Ping in games:
Ping in few games on Central India server:
- Rocket League (Indian Server): 110 ms
- Genshin Impact (Asian Server): 180 ms